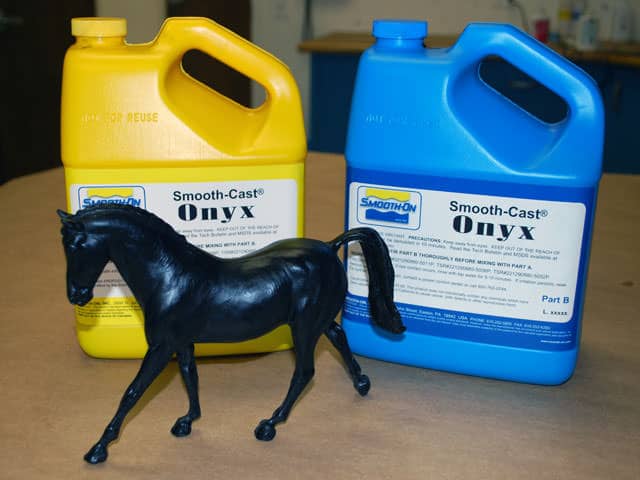
ONYX SLOW and FAST

Black and fast curing resin

My first resin was Smooth-On ONYX fast and slow.
This resin comes als deep black liquid and has two curing durations. Both parts are mixed by volume 1:1. ONYX can’t be colored with tints, white also doesn’t work here.
So no gray liquid can be obtained.
ONYX FAST is really fast. One doesn’t have much time to mix both parts together, the liquid starts to get thicker after 30 seconds. So, mixing pretty fast and pouring must be practiced.
Better put everything in place before starting with mixing.
ONYX SLOW cures slower and is has a longer curing time. 90 minutes of curing time it says.
But I always wait over night to get the sturdy hard plastic. SLOW starts curing after a minute or so.
Be sure to work fast here, too.

Where FAST can only be used for small parts because of the short curing time, SLOW can be used for bigger castings. I used SLOW for my Ebony Dagger castings.
If you want to add fillers to ONYX, be prepared because it will get bubbles.
I tried to add aluminum filler to get a metallic effect, but SLOW is difficult with that. FAST is easier to work with fillers and doesn’t get bubbles while curing.

Also after you got your liquids shipped to you, wait one day until you work with ONYX or other resins.
Let it settle down and work in a room with more or less 23° Celsius degrees. Better not less.
Make absolutely sure you pre-mix both liquids as it says in the datasheet.
The worst thing you can get is an oily coat on your cast and half cured surfaces. The cast is ruined for sure.
So pre-mix the hell out of those liquids.
Trial and error is essential if you want to start with this hobby.
The more you work with certain liquids, the more you know what to do and what not. It can get expensive really fast if you don’t learn how to handle them.

Onyx

Smooth-Cast 300

A white, opaque resin, that has a short cure time and it’s my to go resin for a lot of things

A friend recommended the resin to me and it immediately got one of my favorites. It’s fast curing and tints can be added, but the correct recipe for the tint needs to be written down to ensure a consistent color of your castling.

 Smooth-Cast 326

Takes time to cure, can be tinted

Actually one of my favourites.
It can be tinted with various colors and has a curing time of approximately 90 minutes. The best thing is, you have 20 minutes to get your resin into the mold.
So plenty of time to pour and to let the bubbles come out, before it starts to cure.
You almost don’t need any vacuum degaser for this one. That’s what makes is the best resin for me so far, since I don’t have a vacuum degaser. Yet.
One of the negative experiences I made is, if you have a long cast like a rod, it tends to bend after a while when you store it somewhere. I recommend to add some sort of support into the castling to prevent it from bending. Having a shore hardness D72 deforming can happen, so I recommend to use ONYX instead.

Smooth-Cast 326

EpoxAcast 690

Clear resin, can be tinted, takes a long time to cure

A clear epoxy resin that is as liquid as water when mixed. The mold needs to be tight, otherwise the epoxy will find the tiniest crack to go through and your mold will leak.
The trick to check if your mold is tight: Pour water into the mold. If the mold leaks, try another method to secure it. I work with tension belts and for one mold I need 4 of them, if we take a dagger as example.
Anyway the resin is clear and can be tinted and/or filled with various fillers. I use acrylic powder for the Stalhrim blade and pommel. The resin cures after 12 hours, so pouring it before going to bed might be the best solution.
This is THE resin for translucent or clear blades, gems, or similar items.
ApoxAcast 690 doesn’t need a degaser, but it will look much better if all the bubbles are gone. It works for my daggers without one, though.

Blades with EpoxAcast